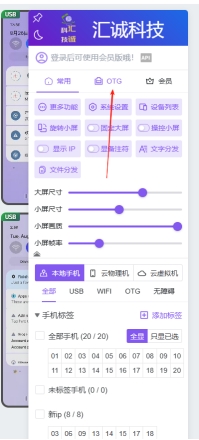
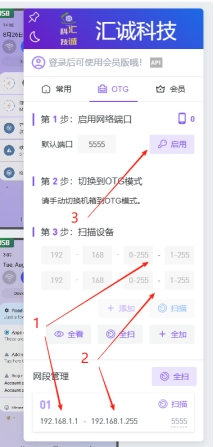
指南与资源

硬件部署、群控自动化与短信验证的操作指南。

Software download link:

Hello everyone, I’m Xiaorui from Huicheng Technology. Today I’ll guide you through the startup process of the Guangzhou Phone Farm:


  1. Device Unboxing


After receiving the device, remove the internal foam padding.

  1. Connect the Device

Connect the power cable and data cable.

Make sure the USB data cable is plugged into the computer’s USB 2.0 port.

The network cable should be connected to the same router as the computer.

(For WiFi cases, no network cable is required.)

If security software flags the program, confirm that the file is from a trusted source and add the relevant file, folder, or domain to your allowlist.

  1. Download Management Software & Authorization

Download the management software, then contact the support team to get the authorization file.


Go to C Drive → Users → .android folder, delete the original file, and replace it with the authorization file.


Restart the computer to complete the screen projection.

  1. Switch to OTG Mode


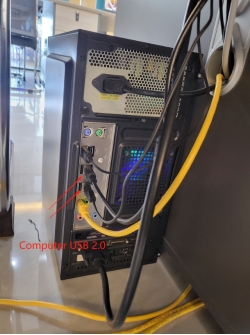
Find the local IP address (IPv4) of your computer.


Enter the subnet range: 192.168.**.2 to 192.168.**.255, then click “Add.”


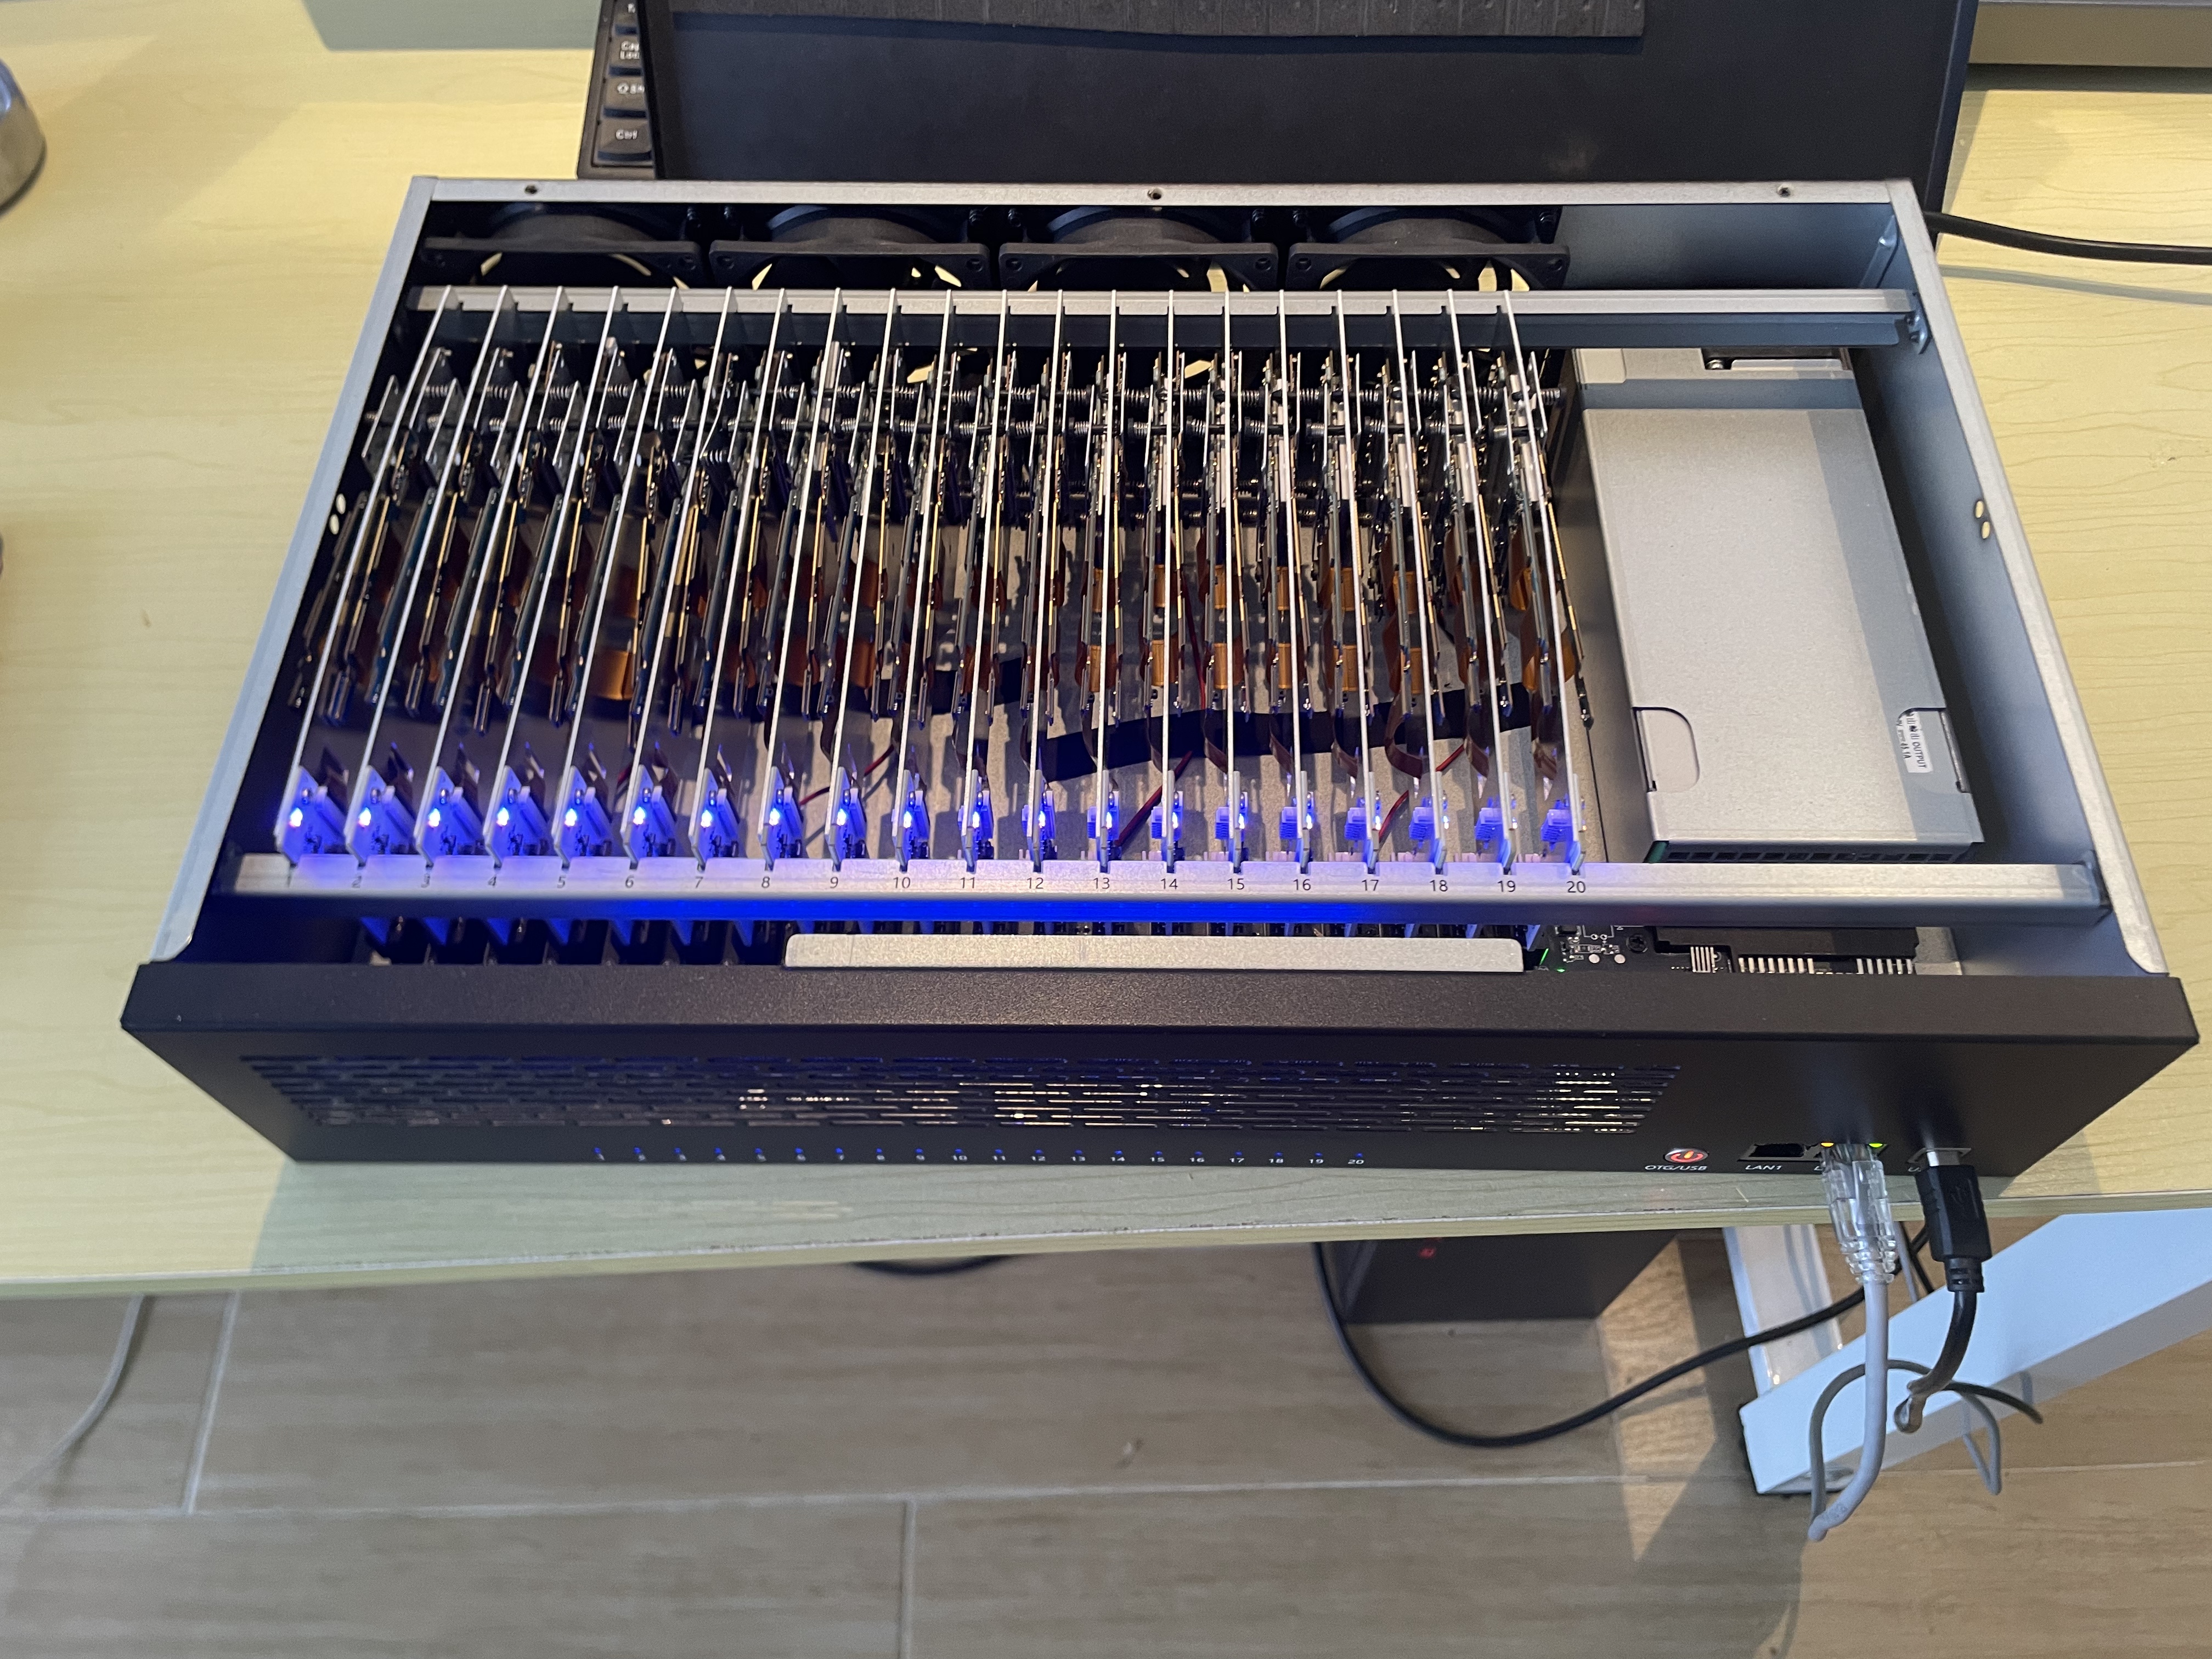
Select all phones, click “OTG,” then click “Enable.”


Quickly press the motherboard power button twice (if the button sticks out, press only once).


Back on the computer, click “Full Scan” under the subnet and wait for all 20 phone screens to project. This completes the switch.

Mode Differences


USB Mode: Requires WiFi to connect to the internet.


OTG Mode: Uses Ethernet, requires a network cable.


Important Notes


Do not disable “Developer Options” in the phone settings.


Do not perform a factory reset on the phones.

群控连接指南:USB 与 LAN/OTG

以下为行业通用连接流程,适用于汇诚集成机箱及多数 Android 主板农场。详细 UI 截图见本页上方教程图;此处为文字步骤清单。

一、USB 模式(首次部署推荐)

  1. 在 PC 安装群控/ADB 驱动;使用带供电的 USB Hub 连接机箱至 PC。
  2. 若软件要求 ADB 授权文件,按供应商说明放入 C:\Users\你的用户名\.android\(无此目录可先启动一次群控软件)。
  3. 机箱上电,USB 接 PC;首次投屏时在设备上点「允许 USB 调试」。
  4. 群控左侧应显示已连接设备数量与在线状态。

USB 模式适合初次授权、批量装 APK、开启网络 ADB。稳定运行后建议切换 LAN 减轻 USB 带宽压力。

二、LAN / OTG 模式(机柜长期运行推荐)

  1. 确保PC 与农场设备连接同一路由/交换机(千兆有线优先)。
  2. 部分固件需先在 USB 模式下,对目标板卡执行「开启 OTG / 网络 ADB(如 TCP 5555)」快捷命令。
  3. 在群控软件中选择「添加局域网设备 / Add LAN Device」。
  4. 填写路由 IP 段(例如 192.168.1.1–192.168.1.254),点击添加后扫描;多网段则多次添加再一键扫描。
  5. 若已知单台 LAN IP,可直接填 IP 快速连接,跳过全段扫描。

切换至 LAN 后通常可拔掉 USB 线(以实际群控软件提示为准)。WiFi 投屏易受干扰,单路由上仅建议少量设备;大规模请用有线 LAN。

三、批量操作(群控常用功能)

  • 同步控制: 勾选多台设备,主控窗口操作同步到选中设备
  • 批量安装 APK: 右键设备编号 → 批量安装 → 多选 APK
  • 批量传文件/图片: 传至指定目录或相册(相册不刷新时可重启设备)
  • ADB 命令/脚本: 常用命令可保存为快捷按钮
  • 分组: 按项目/客户分组,便于大规模调度

汇诚官网提供群控软件;亦兼容业界常见的 ADB 类群控工具 — 我们不提供刷量脚本,脚本化任务须客户自行合规开发。

四、设备检测与维护

  • 连接异常时使用软件内「设备检测」查看 ADB/网络状态
  • 24h 运行前做散热与掉线压测;机房保持通风
  • 定期整理 USB 线与 Hub,避免接口松动
  • 需要短信验证时使用同站真实 SIM OTP,勿依赖云机仿真号码

群控連接指南:USB 與 LAN/OTG

以下為行業通用連接流程,適用於匯誠集成機箱及多數 Android 主板農場。詳細 UI 截圖見本頁上方教程圖;此處為文字步驟清單。

一、USB 模式(首次部署推薦)

  1. 在 PC 安裝群控/ADB 驅動;使用帶供電的 USB Hub 連接機箱至 PC。
  2. 若軟件要求 ADB 授權文件,按供應商說明放入 C:\Users\你的用戶名\.android\(無此目錄可先啓動一次群控軟件)。
  3. 機箱上電,USB 接 PC;首次投屏時在設備上點「允許 USB 調試」。
  4. 群控左側應顯示已連接設備數量與在線狀態。

USB 模式適合初次授權、批量裝 APK、開啓網絡 ADB。穩定運行後建議切換 LAN 減輕 USB 帶寬壓力。

二、LAN / OTG 模式(機櫃長期運行推薦)

  1. 確保PC 與農場設備連接同一路由/交換機(千兆有線優先)。
  2. 部分固件需先在 USB 模式下,對目標板卡執行「開啓 OTG / 網絡 ADB(如 TCP 5555)」快捷命令。
  3. 在群控軟件中選擇「添加局域網設備 / Add LAN Device」。
  4. 填寫路由 IP 段(例如 192.168.1.1–192.168.1.254),點擊添加後掃描;多網段則多次添加再一鍵掃描。
  5. 若已知單台 LAN IP,可直接填 IP 快速連接,跳過全段掃描。

切換至 LAN 後通常可拔掉 USB 線(以實際群控軟件提示為準)。WiFi 投屏易受干擾,單路由上僅建議少量設備;大規模請用有線 LAN。

三、批量操作(群控常用功能)

  • 同步控制: 勾選多台設備,主控窗口操作同步到選中設備
  • 批量安裝 APK: 右鍵設備編號 → 批量安裝 → 多選 APK
  • 批量傳文件/圖片: 傳至指定目錄或相冊(相冊不刷新時可重啓設備)
  • ADB 命令/腳本: 常用命令可保存為快捷按鈕
  • 分組: 按項目/客戶分組,便於大規模調度

匯誠官網提供群控軟件;亦兼容業界常見的 ADB 類群控工具 — 我們不提供刷量腳本,腳本化任務須客戶自行合規開發。

四、設備檢測與維護

  • 連接異常時使用軟件內「設備檢測」查看 ADB/網絡狀態
  • 24h 運行前做散熱與掉線壓測;機房保持通風
  • 定期整理 USB 線與 Hub,避免接口鬆動
  • 需要短信驗證時使用同站真實 SIM OTP,勿依賴雲機仿真號碼

Group Control Setup: USB vs LAN/OTG

Generic connection workflow for Huicheng integrated chassis and most Android motherboard farms. UI screenshots are above on this page; this section is a step checklist.

1. USB mode (recommended for first setup)

  1. Install fleet/ADB drivers on PC; connect chassis via a powered USB hub.
  2. If required, place the vendor ADB authorization files in C:\Users\YourName\.android\ (launch fleet software once to create the folder).
  3. Power the chassis; plug USB to PC; tap Allow USB debugging on first mirror.
  4. Fleet UI should show connected device count and status.

USB is best for initial auth, batch APK install, enabling network ADB. Move to LAN for steady 24/7 runs.

2. LAN / OTG mode (recommended for rack operation)

  1. PC and farm devices must share the same router/switch (gigabit wired preferred).
  2. Some firmware requires enabling OTG / network ADB (e.g. TCP 5555) from USB mode first.
  3. In fleet software: Add LAN Device.
  4. Enter router IP range (e.g. 192.168.1.1–192.168.1.254), add, then scan; repeat for multiple subnets.
  5. Known device IP? Enter it directly for faster connect.

After LAN connect you can usually remove the USB cable (follow your software prompts). WiFi mirroring is noisy — keep counts low per AP; use wired LAN at scale.

3. Batch operations

  • Sync control — master window drives selected devices
  • Batch APK — right-click device ID → install multiple APKs
  • Batch files/images — push to path or gallery (restart device if gallery cache stale)
  • ADB commands/scripts — save frequent commands as shortcuts
  • Groups — organize by client/project for large fleets

Huicheng provides official fleet software; common third-party ADB fleet tools are also compatible. We do not supply engagement-fraud scripts.

4. Health checks

  • Use in-app device detection when mirrors fail
  • Run 24h thermal/uptime tests before full rollout
  • Manage cables/hubs to prevent loose ports
  • For verification codes use same-site real SIM OTP — not cloud simulation
企业级手机农场 硬件、机架与自动化群控
全球短信验证 200+ 国家 · 钱包计费
广州研发 · 全球交付 B2B 支持 · 安全支付

汇诚科技

可持续手机农场与全球短信平台

Scroll to Top